Exponential Growth Simulation

I’ve been working at improving my Unity3D skills. We are using Unity in the Game Programming class I’m teaching this semester. I wanted to build a project that focused on creating some GameObjects that interact with each other through various public methods. So I made a growth simulation that represents a group of bacteria eating and reproducing.

The game objects include bacteria, food, and a game manager. All the food object does is keep track of how much food is available, and provide a public method called supplyFood(), with which the bacteria can acquire food to eat. The game manager object creates a grid of food tiles to be used as a food supply. It also keeps track of the number of bacteria in the game through public methods addBacteria() and removeBacteria().

The bacteria does a number of things. I tried to make this object class self-managing. So it has a timer that makes regular calls to the eat() method, and reproduce() method is based on doing a number of eats. There is also a die() method that takes the bacteria out of the game. But it doesn’t completely work correctly yet, I’m still debugging it.

One tricky part was finding out if the bacteria was touching a food tile, so it could eat. I used a collision detection method to initiate that. It is interesting how objects can connect with one another. Here is an example of how the bacteria connects to the food.

These variables are declared to give access to the foodTile object and the supplyFood() method of its food script:

  public GameObject foodTile; // the food object 
  public food food; // the food script found in the foodTile object; provides access to the supplyFood() method. 
  private int foodAmt; // the food counter

When a bacterium collides with (sits upon) a foodTile tagged “food” it opens a connection to the script it contains called “food.” I was concerned that doing this each time a new bacterium is created and collides with a foodTile, it would be a lot of processing overhead. But so far, it seems to be working.

   void OnCollisionEnter(Collision collision)
   {
      if (collision.collider.gameObject.tag == "food")
      {
         foodTile = collision.collider.gameObject; // connects the foodTile to this bacterium
         food = foodTile.GetComponent<food>(); // the food script of foodTile gives us supplyFood() method
      }
    }

Here is the eat() method that uses that uses the food script of the foodTile.

     public void eat()
     {
         int foodAmt = food.supplyFood();
     }

It took me a while to understand how getComponent works. It basically allows access to any component of a given object, including scripts. object.getComponent<component>();

Here is a video of what it looks like in Unity3D right now:

Old With New

Japan War

Yesterday’s Daily Create called for juxtaposition of old with new. As a starting point, it gave us some old Japanese & Chinese prints to work with.

I selected the above print, and used Photoshop to add in something new, the aircraft carrier USS George H.W. Bush. The assignment offered “extra Internet points” for animating it, so I did that as well.

To animate an object in photoshop, I enabled the timeline. I pasted in the carrier on a new layer, after cutting it out with a selection made using the pen tool. I pasted it on to the post card. On the post card, I also cut out some of the foreground scenery and pasted it onto the topmost layer, allowing the aircraft carrier to sail in the background.

Using the timeline, I created new frames, and moved the carrier a bit to the left on each frame. My gif uses ten frames of animation. Once it was all completed, I saved using the export for web feature, saving it as an animated gif.

Character Following Camera in Unity3D

One thing beginning game developers using Unity 3D might want to do early on is to have a 3rd person character that is followed around by a camera. It is fairly simple to accomplish, but it can be tricky if not done correctly.

Here are the steps.

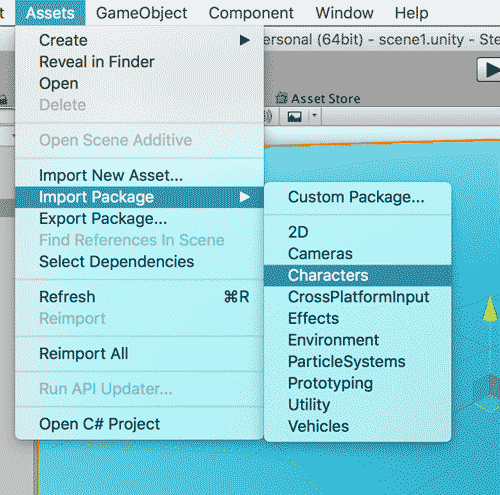
  1. Import Assets -> Import Package -> Characters. (Accept the defaults).
  2. Import Assets ->Import Package -> Cameras. (Accept the defaults).
  3. Make a ground object.
    • create a cube object (Game Object -> 3D Object -> Cube)
    • rename it ground
    • set its scale property to (100, 1, 100)
    • add a texture image (just import one and drag it to the ground object)
  4. Add a Multipurpose Camera Rig
    • In the Project tab, find the following: Assets -> Standard Assets -> Cameras -> Prefabs -> MultiPurposeCameraRig
    • Drag and drop the MultiPurposeCameraRig prefab to the scene window
    • Disable the MainCamera by selecting it in the Hierarchy window, then deselecting the checkbox next to the “Main Camera” name in the Inspector window.
  5. Add a 3rd Person Character
    • Also in the Project tab, find: Assets ->Standard Assets -> Characters -> ThirdPersonCharacter -> Prefabs -> ThirdPersonController
    • Drag and drop a ThirdPersonController prefab to the scene window
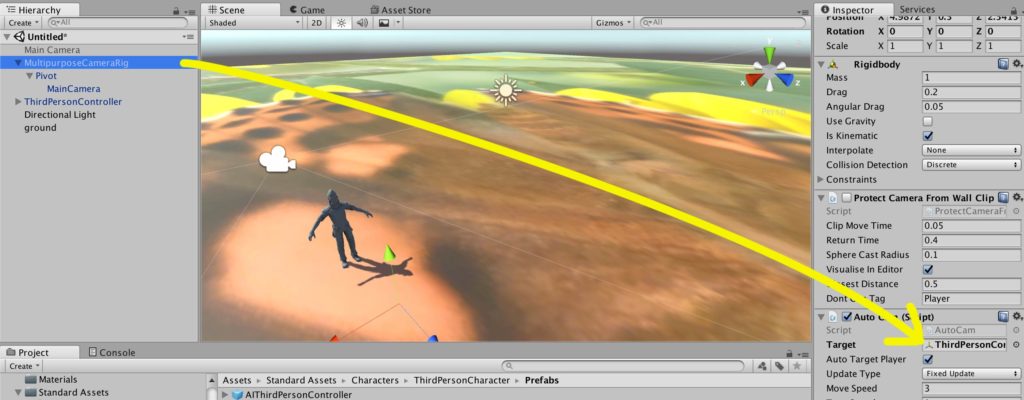
  6. Connect the Multipurpose Camera Rig to the ThirdPersonController
    • Select the MultipurposeCameraRig object in the Hierarchy window.
    • Drag the ThirdPersonController from the Hierarchy window to the “Target” field of the MultipurposeCameraRig’s Auto Cam Script found in the Inspector panel. (Should be dragging across from the leftmost panel to the rightmost panel.) Connect Camera to Character
  7. That’s it. Play the game and if everything is setup correctly, you should have a camera that follows the player.

Instantiate a Prefab using Code in Unity 3D – Part 2

In our previous post, we learned how to use code to create an instance of a prefab object in Unity3D. In this post, we will see the power of using code to do repetitious work. Whenever I think of using code to do something that repeats, I think of using loops.

Last time we created a graphic that represented one single step of a staircase. Now we will create many instances of that same graphic, and move them in such a way that it builds a staircase. To do that, we will use the famous “for/next loop”

instPlank4Here is our single step. Now let’s make some more to create a staircase.

Open the “MakeStep” script from last time. Look in the Start() method for this line of code:

Instantiate(stepPrefab, stepPos, Quaternion.identity);

This is the piece that brings our stepPrefab into our Unity world. Now, let’s add a for loop around it to get it to repeat and build a “Stairway to Heaven.” Your code should look something like this:

for(float i = 0; i < 20; i++) 
  { stepPos.y = i;
    stepPos.z = i;
    Instantiate(stepPrefab, stepPos, Quaternion.identity);
  }

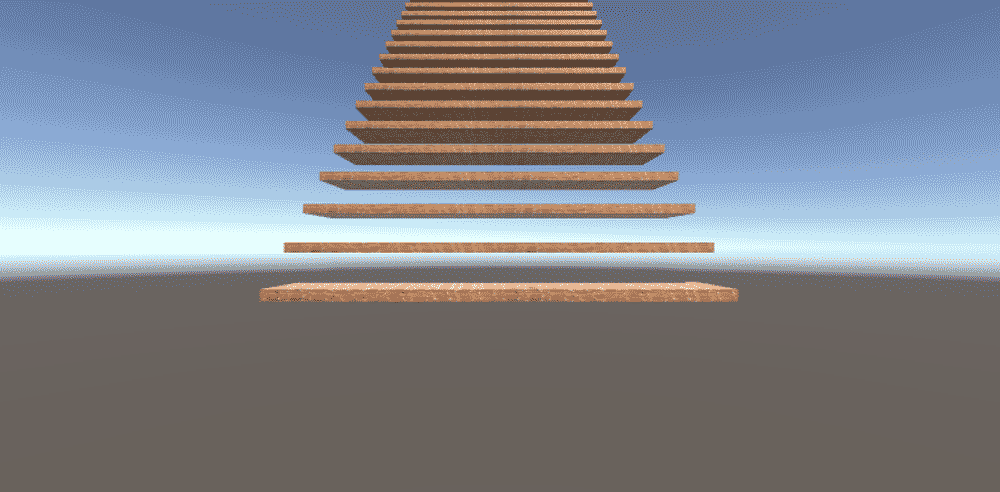
If we run the code at this point, we’ll get a staircase that looks like this:

instPlank5

The y values are too far apart, and the z values will overlap. I want my staircase to be useable by a character in the game. So I will modify my loop to bring my steps closer together.

for(float i = 0; i < 20; i++) 
  { stepPos.y = i / 4;
    stepPos.z = i * 2;
    Instantiate(stepPrefab, stepPos, Quaternion.identity);
  }

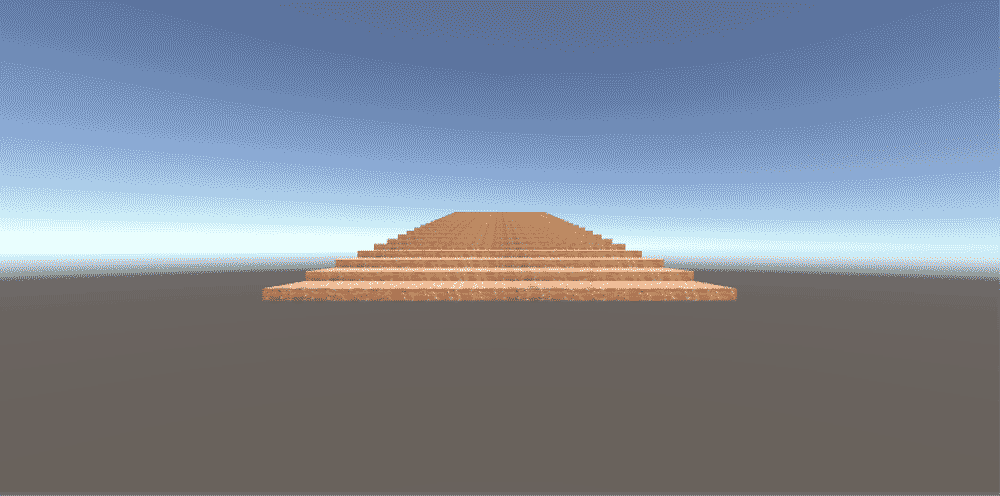
This is more like it:
instPlank6Now, we just have to add a floor, and a character to the scene, and we’ll be in business!

To make a floor, create a new cube. Set its position to (0,0,0). Give it a texture using a graphic or color using a material. Set its scale to 100 x 1 x 100.

To add a character to the scene, Import the characters package, accepting all defaults. It will take a minute or two to bring in all of the stuff for characters. It is found under Assets -> Import Package -> Characters.

instPlank7

After everything installs, in the newly created “Standard Assets” folder, go to Standard Assets -> Characters -> FirstPersonCharacter -> Prefabs and select  the FPSController prefab. Drag it into the scene. Because the character has its own camera, you should disable the Main Camera in the hierarchy.

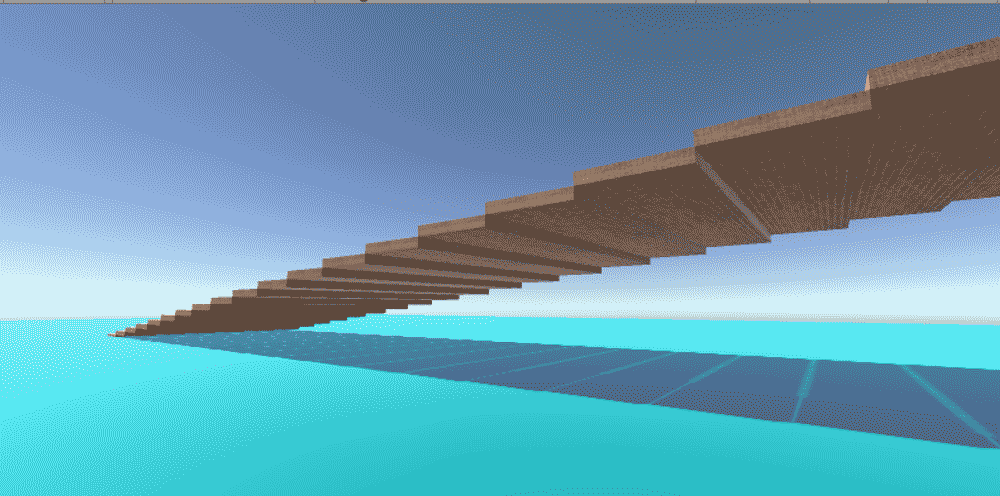
You should be able to play the game and move around in the world you just created using the mouse and arrow keys. Here is a view from beside the staircase.

instPlank8So that is my introduction to creating prefab objects in Unity3D using C# code.

Students and Educators can get Unity3D for free so you should try it. Download it here.


Instantiate a Prefab using Code in Unity 3D – Part 1

This year, in the Game Programming course I teach, at the urging of my students we have begun working with Unity3D. I’ve always used Flash in the past for this course, but some things have changed for me both personally and professionally to where I felt I could spare the time to begin with a new development platform. Any interested students or educators can learn along with us by downloading Unity3D for free.

For this post, we are going to discuss creating prefab objects (just a saved game object that has some preconfigured properties added to it) and using code to create instances of those prefabs.

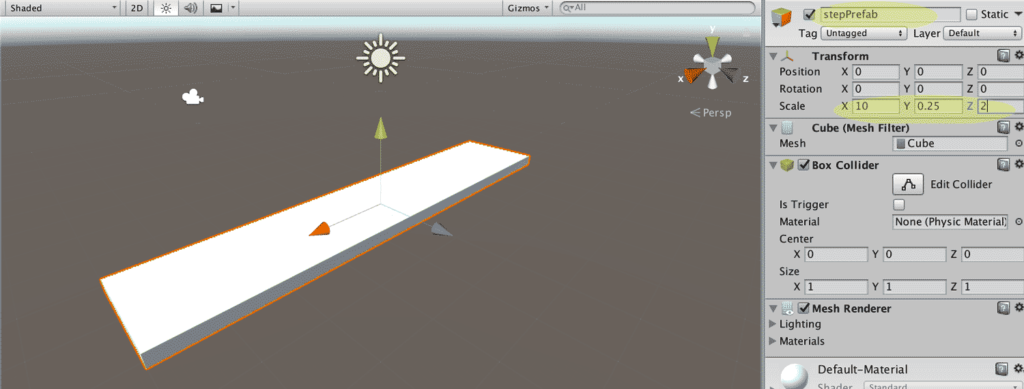
To begin, let’s make a prefab object by creating a new cube (Game Object -> 3D Object -> Cube) and setting its position at (0,0,0). Rename this cube to “stepPrefab.” Scale the x dimension to 10, and the z dimension to 2, and the y dimension 0.25. This will create a plank-like block that will become a step in what will later become a staircase.

instPlank

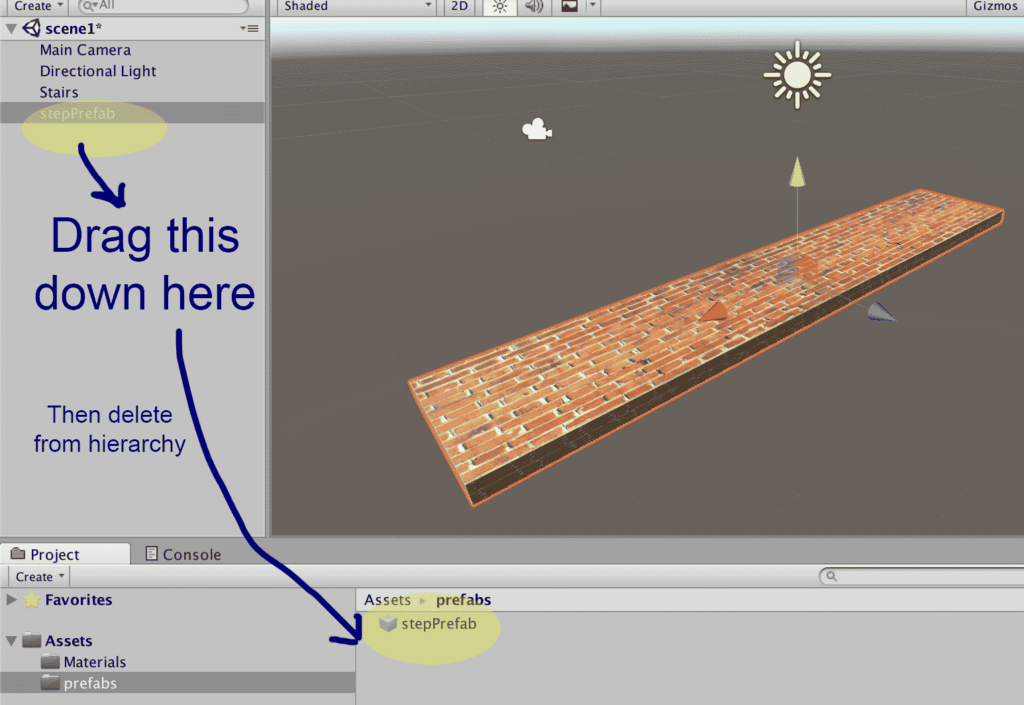
Decorate the step as you like using materials or graphics. Online, I found an image of bricks I used to make a brick texture, but you can also simply create a material and set its color to use. Once you have decorated the step, create a “prefabs” folder in the project panel under Assets. Drag and drop your decorated brick into the prefabs folder. There it will become a prefabricated object or “prefab” that we can manipulate with code. Delete the stepPrefab object from the hierarchy tab, but leave it where you put it in the prefabs folder. Except for the light and camera, our world should be empty again.

instPlank2

Next, create a new folder called “scripts” under Assets, also in the Project panel. Create a new C# script inside of the scripts folder, either by right-clicking or clicking on the Create button. Name this script to “MakeStep.” Double-Click the “MakeStep” script to open it in an editor.

Just inside of the MakeStep class, declare a public variable of type Game Object called “stepPrefab” and a second of type Vector3 called “stepPos” at the game’s origin position. That code looks like this:

public GameObject stepPrefab;

public Vector3 stepPos = new Vector3(0f, 0f, 0f);

Now, inside of the Start() function write a line of code that will instantiate (create)  an instance of our stepPrefab object. Here’s the code:

Instantiate(stepPrefab, stepPos, Quaternion.identity);

Here, the Instantiate function creates a new stepPrefab object, places it at the stepPos position, and uses no rotation (that’s the Quaternion.identity bit.)

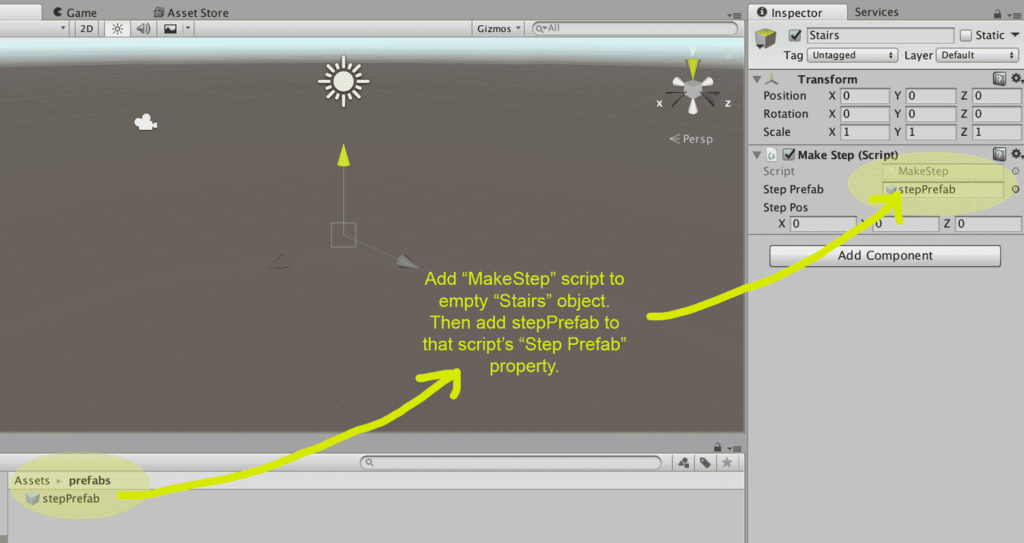
Save and build the script. Now, switch back to Unity3D. Create an empty game object. Give it a name “stairs.” With “stairs” still selected, browse to the folder containing the MakeStep script, and drag that script on to the “add component” area of the inspector window. This should add the MakeStep script to the empty “stairs” object, now visible as a component of “stairs” in the inspector.

Inside the script component just added, locate the field box called “Step Prefab.” Right now, it should say “None (Game Object).” This is where we will make the connection between the Unity 3D world, and the MakeStep script. To do this, drag and drop the stepPrefab object in the Assets/prefabs folder over to the Step Prefab box in the inspector window. Now our world and our script should be connected together.

instPlank3

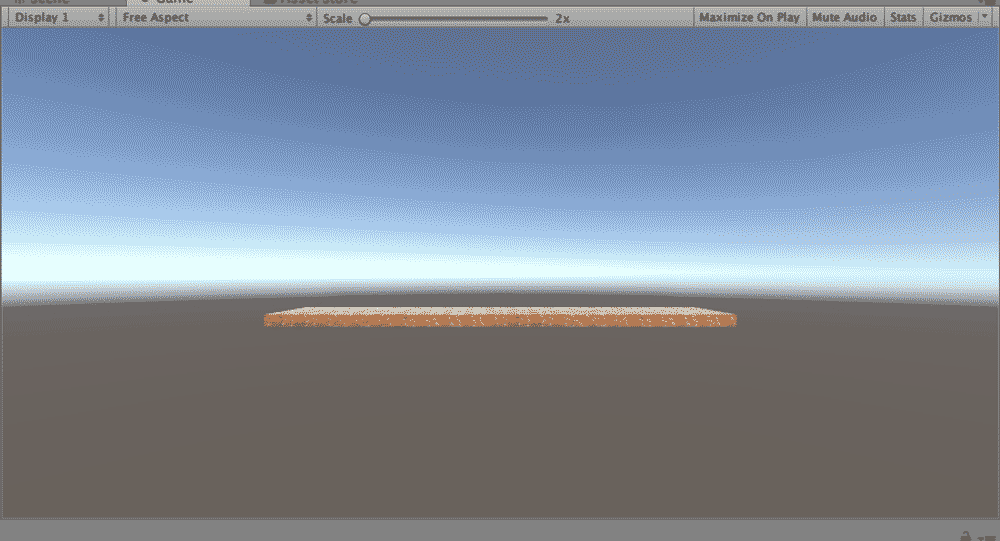
If everything is in order, it is time to test our world. Click the play button in unity. You should now see an instance of the stepPrefab object.

instPlank4

Next up, we will build a set of stairs using this object.

Unity Programming – A New Platform.

I’ve been teaching the Game Programming class with Unity 3D for two weeks now. This is the first time we’ve used Unity in the class. It’s been interesting, and a challenge to my previous knowledge on the subject. In previous iterations of the course, we used Flash and Actionscript.

Something new I learned about recently is the comparison between inheritance and composition in object oriented programming. I hadn’t really encountered composition before, only the inheritance approach. So when diving into Unity, I didn’t really see OOP with inheritance and I wondered why that was the case. It turns out the Unity uses a composition approach.

Basically, instead of having a superclass and subclasses that all must conform to or override the superclass, each object is assembled out of components or capabilities.

This old JavaWorld article explained it nicely for me. https://www.javaworld.com/article/2076814/core-java/inheritance-versus-composition–which-one-should-you-choose-.html

What I Learned Fall 17 Kickoff

It is a tradition at our school to celebrate the beginning of a new school year with a workshop for the staff and faculty. Frequently referred to as an inservice day, ours is affectionately known as the “Fall Kickoff.” I wanted to jot down a few thoughts about what I learned at ours yesterday.

  1. We went over the new policies at K-State regarding concealed-carry on campus. Yes, you read that right. In the state of Kansas, anyone over the age of 21 (with certain restrictions such as no criminal record) can carry a concealed handgun on campus. While concealed carry training is recommended, there is no law mandating such training.
    • Because of how our state law is written, the only permitted weapon on campus are handguns. Other weapons such as BB guns, blowguns, nun-chucks, etc. are not permitted.
  2. My friend and colleague Troy Harding, recipient of the Rex McArthur Family Faculty Fellow Award, spoke to us about the experience of working with teachers from the Junction City area on a technology education grant. He was inspired by their enthusiasm for and dedication to teaching. I hope to connect with these (and other great teachers from our region) hopefully through Twitter and #ksedchat. I used to be more involved in Twitter-based chats with teachers, and want to get back into that.
  3. We saw a fascinating video about Don Norman and his theory on emotional design. I wasn’t familiar with him before. I’m really interested in his ideas, and want to read some of his books now. See that video here:
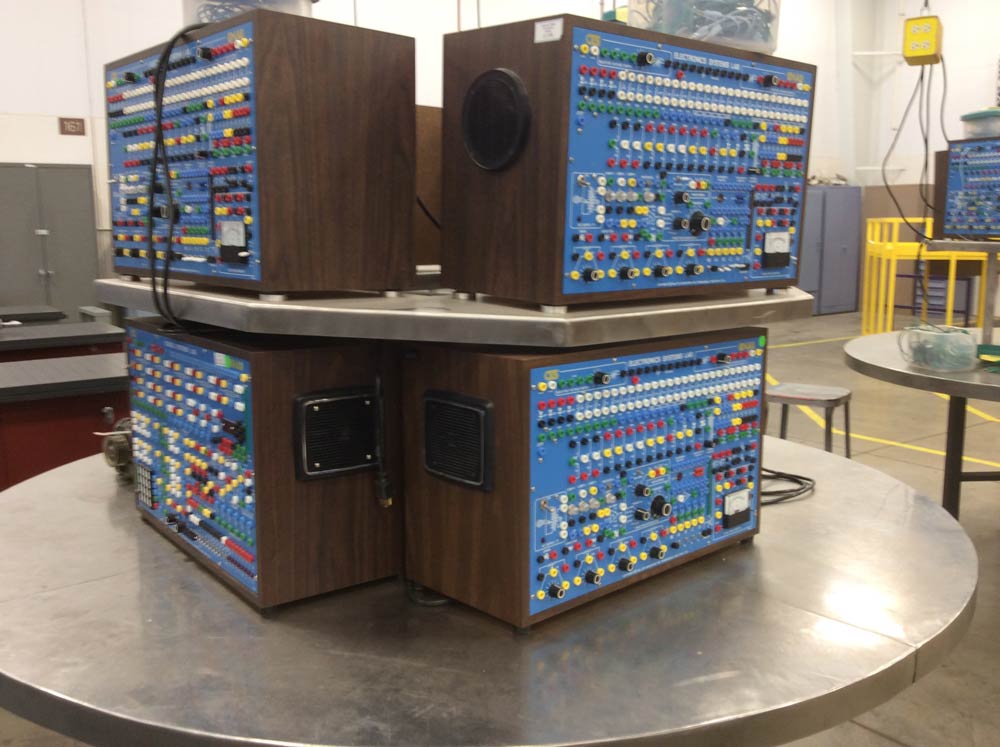
  4. We toured all of the Aviation areas on our campus and learned about their degree programs. Among other things, I got to fly a drone and I saw the equipment for learning electricity/electronics in the aviation maintenance lab. droneThingI teach a week on basic electricity. These things could make a great lab for my students to try their hand at making basic circuits.
  5. electronicThing

Overall, it was a relevant day. Throughout the year, we are going to become familiar with all of the degrees offered on our campus. It was a good start to a new year!

Promotion

Yesterday I attended the Kansas State University shindig recognizing this year’s promoted faculty. We have some amazing people working at this place. There were professors hailing from all over the world. Everyone was from somewhere else, it seemed, and I think that’s pretty normal in academia. It’s not very prestigious for everyone to be home-grown.

But I was there too. A Marysville High School graduate, from just up the road to K-State. A military veteran, recruited out of Manhattan, KS. A Cloud County Community College graduate among scholars from MIT and Harvard. And yes, proudly a graduate of, with my final degree earned at Kansas State University.

Doesn’t it seem just a little bit strange that I was the stranger there, the odd one, being the Kansas native with the background I have? But there I was, a professor at K-State. So happy, and so proud to be serving the people of the state that I call home – Kansas.

Trip to the ER

The evening of Thanksgiving in 2015, about a year and a half ago, I experienced the worst stomach ache I’ve ever had. We were staying in a hotel visiting family, and I spent several hours writhing in pain on the floor of the room. No stores were open, and I didn’t have any stomach remedies with me, so I just sat there and suffered. I figured that I had over-eaten, and left it at that.

After that, not too long afterwards, it happened again. I figured that I was either eating too much, or there were certain foods that no longer agreed with me. So I began watching how much I would eat and tried to pay attention to the kinds of foods that would trigger it.

I figure over the past year and a half, I’ve had similar episodes of severe stomach pain 4-5 times, with some lesser ones thrown in as well. Sometimes, if I realized it was likely to happen, I could stave it off by going for walks.

Historically, I haven’t really been one for seeing doctors. I’d never been to the emergency room. The last time I was a hospital patient was when I was born. I knew something was going on with my health, but I didn’t know exactly what, or what to do about it. But after my last stomach episode, I decided if it happened again, I’d go to the doctor or ER.

Last Saturday evening, after a delicious meal of crock pot roast beef & potatoes, the pain started up again. It was the worst I’d ever felt. I was coughing, vomiting, and had unbelievable discomfort in my gut, a pressure that couldn’t be relieved. Finally, around 11pm, I decided to go to the ER.

Now the hospital is 15 miles away and I decided to drive myself there. Probably not the best decision to drive myself, but it was late, and I didn’t want to upset the family. I told my wife where I was going, and let the kids sleep. When I finally arrived at the hospital, it felt like it was taking forever to get checked in and answer all of their questions.

Oh, it hurt! But it seemed like it was taking forever to get any relief. Drawing blood. Asking questions. Trying to figure out what was going on with me. Finally, they gave me an IV and some pain killers and I was able to relax. I was getting woozy, and had to lie down. Soon, I was getting X-rayed and CT scanned, and with those results we knew I had a problem with my gallbladder, and it had to come out.

I had to go to another hospital an hour away to have surgery, so that meant I’d go for my first ambulance ride. I called my wife and told her to meet me there. I was so tired, I slept most of that ride. Once I got checked into the Salina hospital, there were more tests, more questions, and explanations about what was going to happen. I would be having emergency surgery. It was all happening so fast. Incredibly fast, really. In less than 20 hours, I would go to the ER, transfer to another hospital, have my gallbladder removed, and return home again.

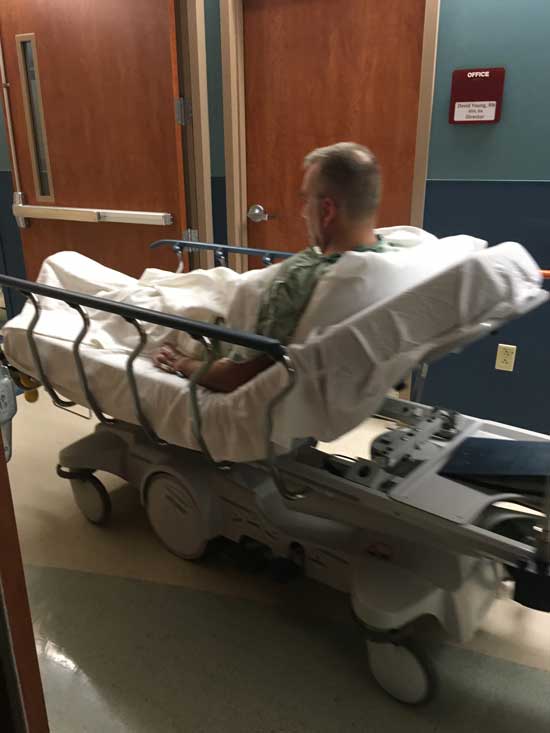
Here we are, just before going into the operating room. I was obviously feeling no pain at this point.

Before surgery

I probably should have been more nervous about things than I was, but heading into the operating room, it only took a couple of minutes and it was lights out for me.

Heading to OR

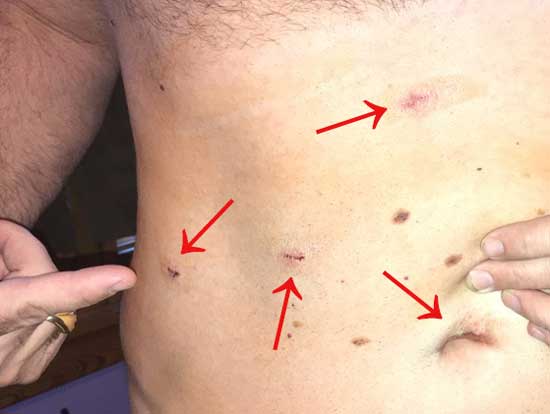
It only felt like a couple of minutes later, and I was awake again and the surgery was already done. I was amazed that I was able to walk within a few hours after surgery. I was sent home on the same day. I was able to take my dog for a walk that evening. A big part of the speedy recovery is that it was a laparoscopic surgery done with cameras and four small incisions instead of one large one.

surgery scars
Gallbladder surgery used four small incisions.

The wifi was good in the room.

inTheRoom2

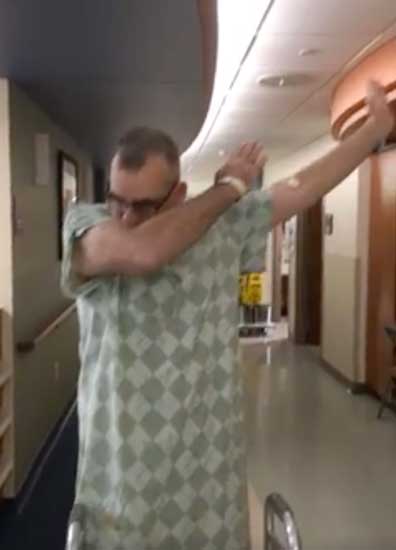
I used the walker to regain my legs. My daughter asked me to do a dab.

dab

Recovery has been pretty quick. I’ve had some tenderness and soreness, but overall things are getting back to normal pretty quickly.